Ansible Vault ES
Vault passwords
Test update Por seguridad utilizamos ansible-vault para guardar algunas contraseñas.
Referencias:
http://www.linuxsysadmin.tk/2016/09/lanzando-playbooks-de-ansible-desde-jenkins.html
http://docs.ansible.com/ansible/intro_windows.html
Estructura para uso de VAULT_FILE
Utilizaremos archivos llamados SECRETS_XX, ej:
.
├── ansible.cfg
├── group_vars
│   ├── all
│   │   ├── credentials_sql
│   │   ├── SECRETS_SQL
Los archivos @SECRETS_ALGO@ tienen las variables con las claves.
Variables definidas dentro de archivo @SECRETS_XX@
Las variables tendrán la nomenclatura:
VAULT_NOMBRE_VAR
De esta forma podemos utilizar la variable dentro de nuestras definiciones, en archivos no cifrados con vault para más facil acceso.
Ejemplo, el archivo credentials_sql contiene:
---
#---ommited-lines---
# Default user and pass:
ansible_sql_user: "usuario_sql"
ansible_sql_pass: "{{ VAULT_SQL_PASS }}"  # VAULT_SQL_PASS está dentro de archivo cifrado SECRETS_SQL
#---ommited-lines---
Donde se puede notar claramente que el “{{ VAULT_SQL_PASS }}” es una variable definida dentro de uno de los archivos @SECRETS_XX@.
Configurar @ansible.cfg@
Deben tener dentro de [defaults] en el archivo ansible.cfg, la siguiente línea:
vault_password_file = $HOME/.vault-passfile
Conviene que ansible.cfg esté en el mismo directorio desde donde se ejecuta ansible-playbook, normalmente usando git lo ponemos en la raíz del repositorio. (Es más flexible que configurarlo por servidor)
Creando el vault-passfile
Este archivo tiene la contraseña del vault y se usa automáticamente (configurado en @ansible.cfg@), ejemplo:
echo "somepass" > /home/v744989/.vault-passfile
También para los servidores que ejecutan ansible, ej jenkins:
echo "somepass" > /var/lib/jenkins_home/.vault-passfile
Antes de ejecutarlo conviene cambiar a usuario jenkins, usando ej: @sudo su jenkins@ Donde jenkins_home es el usuario, ejemplo jenkins
Cifrando archivos
ansible-vault encrypt group_vars/all/SECRETS_SQL
Encryption successful
Si ya tenemos el @vault-passfile@ creado no nos preguntará este.
Editar cifrado
ansible-vault edit group_vars/all/SECRETS_SQL
Si ya tenemos el @vault-passfile@ creado no nos preguntará este.
Graylog2 - 4 Nagios Services checks
After you have all the previous setup done, please don’t forget to add additional checks to ensure graylog is always running, examples with nagios:
# file: graylog_servers_services.cfg

define service {
    host_name               GRAYLOG_HOST
    service_description     logstash_service_running
    check_command           check_service_nrpe!logstash
    use                     generic-service
    notes                   Some important notes
}

define service {
    host_name               GRAYLOG_HOST
    service_description     graylog-server_service_running
    check_command           check_service_nrpe!graylog-server
    use                     generic-service
    notes                   Some important notes
}
Roles used on Nagios server to setup these commands:
https://github.com/CoffeeITWorks/ansible_nagios4_server_plugins
https://github.com/pablodav/ansible_nagios_common_nrpe
https://github.com/search?utf8=%E2%9C%93&q=org%3ACoffeeITWorks+nagios&type=
Graylog2 - 3 - Logstash nagios_nsca
Introduction
Here we will explain howto add notifications to nagios using Graylog and logstash.
In this case we will send 2 notifications:
- from Graylog using Streams and commands plugin.
- From Logstash using plugins-outpus-nagios-nsca

Requirements
Have read both articles:
We need also 2 new roles to have in our ansible-control-machine.
We will use requirements.yml, and follow same steps: Graylog_ansible_installing_roles
So add these lines:
- src: https://github.com/CoffeeITWorks/ansible_nagios_graylog2_nsca.git
  name: ansible_nagios_graylog2_nsca

- src: https://github.com/CoffeeITWorks/ansible_nagios_graylog2_nsca_config_nagios.git
  name: ansible_nagios_graylog2_nsca_config_nagios
And install the roles with ansible-galaxy install -r requirements.yml
Ansible Inventory
We will use same inventory as created at: at Graylog_ansible_inventory
Preparing the variables
The folder was created during the preparatives at: Graylog_ansible_variables
We will modify group_vars/graylog2_servers/logstash_vars:
Modify logstash_custom_outputs variable, so it will look like:
logstash_custom_outputs:

  - output: 'gelf'
    lines:
      - 'host => "localhost"'
      - 'port => "12201"'

  # https://www.elastic.co/guide/en/logstash/current/plugins-outputs-nagios_nsca.html
  - output: 'nagios_nsca'
    if_condition: '"Resolved" in [status]'
    lines:
      - 'host => "{{ ansible_nagios_graylog_nagios_server }}"'
      - 'nagios_service => "LOGSTASH"'
      - 'nagios_status => "0"'
      - 'nagios_host => "{{ ansible_nagios_graylog_hostname }}"'

  - output: 'nagios_nsca'
    if_condition: '"Activated" in [status]'
    lines:
      - 'host => "{{ ansible_nagios_graylog_nagios_server }}"'  # This is the nagios server
      - 'nagios_service => "LOGSTASH"'                        # This is the service to send status in nagios.
      - 'nagios_status => "2"'                                # The status to send to the service.
      - 'nagios_host => "{{ ansible_nagios_graylog_hostname }}"'  # This is the host to send status in nagios.
As noticed we added 2 output nagios_nsca, with conditions (One for Activated and other for Resolved in [status]). As we have
filtered (transformed) the data to json, we can us the if condition. See Graylog_logstash_input.
In this example the json data has [status] var to check, but you can also use without if condition to send nsca check always.
We have also ansible_nagios_graylog_main_server and ansible_nagios_graylog_host vars, you can define here the host and nagios_host.
We will define also file with these two vars:
group_vars/graylog2_servers/nagios_graylog:
If you have different servers for testing and production you could put these variables on the specific host_vars/grayloghostname
---

ansible_nagios_graylog_nagios_server: 'YOURNAGIOSSERVER'

# This variable will be used by ansible_nagios_graylog2_nsca role.
# Will create an script called  /usr/local/sbin/graylog2-alert.sh
# This script is by default defined in var ansible_nagios_graylog_nsca_script, but you don't need to change it.
# It's a list of nagios hosts to send the command nsca
ansible_nagios_graylog_nagios_servers:
  - '{{ ansible_nagios_graylog_nagios_server }}'

# The hostname that will be created in nagios to
# setup nagios_services and then receive the alerts on these nagios_services
ansible_nagios_graylog_hostname: 'YOURGRAYLOGHOSTNAME'
Preparing variables for nagios_config
We will need to setup inventory with nagios4_servers group and add our nagios host here.
Then add file: group_vars/nagios4_servers/nagios_graylog
If you have different servers for testing and production you could put some of these variables on the specific host_vars/nagioshostname
ansible_nagios_graylog_setup_nagios_host: true
ansible_nagios_graylog_hostname: 'YOURGRAYLOGHOSTNAME'  # Your grayloghostname to setup the nagios service
ansible_nagios_graylog_parents: 'FRB_CLUSTER'
ansible_nagios_graylog_address: 'IP.ADD.RE.SS'  # Your graylog ip add to setup the nagios host
ansible_nagios_graylog_template: 'servers_linux_template'  # Change it to your own template or use generic-service

# nagios configuration (optional settings):
ansible_nagios_graylog_setup_nagios_service: true

# Nagios Service for each streams to configure:
ansible_nagios_graylog_nagios_streams:

  - name: "Graylog2-Azure_streams"
    contact_group: "Graylog2-Azure_streams"

  - name: "LOGSTASH"
    contact_group: "Graylog2-Azure_streams"

# Nagios contact groups for each streams:
ansible_nagios_graylog_nagios_streams_contactgroups:

  - contact_group: "Graylog2-Azure_streams"
    members: "nagiosadmin"

# nagios configuration options:
nagios_etc: '/usr/local/nagios/etc'
# Where we will add the nagios configuration
nagios_config_cfg_dir: "{{ nagios_etc }}/conf.d"
Preparing the playbook to run the roles
Here we will add to roles.graylog2.yml as examplained at: Graylog_ansible_playbook
- name: Apply nagios_nsca for graylog2 servers
  hosts: graylog2_servers
  become: yes
  # environment: "{{ proxy_env }}"
  roles:

    - role: ansible_nagios_graylog2_nsca
      tags:
        - role::ansible_nagios_graylog2_nsca
        - graylog2_servers


- name: Config nagios hosts service and host for graylog nsca stream services
  hosts: nagios4_servers
  become: yes
  # environment: "{{ proxy_env }}"
  roles:

    - role: ansible_nagios_graylog2_nsca_config_nagios
      tags:
        - role::ansible_nagios_graylog2_nsca
        - role::ansible_nagios_graylog2_nsca_config_nagios
Run the playbook
use same steps as described in: Graylog_ansible_run
Or run only logstash role calling with tag:
ansible-playbook -i inventory roles.graylog2.yml --limit graylog2_servers -u user -k -K --become --tags
What we have done
- We have modified logstash vars, now we have two outputs sending nsca message to nagios service.
- We have added role: ansible_nagios_graylog2_nsca_config_nagios. ** It will create our configuration in nagios.
- We have added role: **ansible_nagios_graylog2_nsca ** It will add script: /usr/local/sbin/graylog2-alert.sh ** Also will setup configure graylog2-plugin-exec
You can use your own nagios config to setup the host and server, then not need to use ansible_nagios_graylog2_nsca_config_nagios role if you don’t like it. But using this role will make things faster.
Configure graylog for exec
Now logstash is sending alerts, but we need to setup Graylog Alerts to use Exec callback plugin
Checkout doc: https://github.com/nksft/graylog2-plugin-exec#usage
First create a Stream
I will create 2 streams for Azure messages:
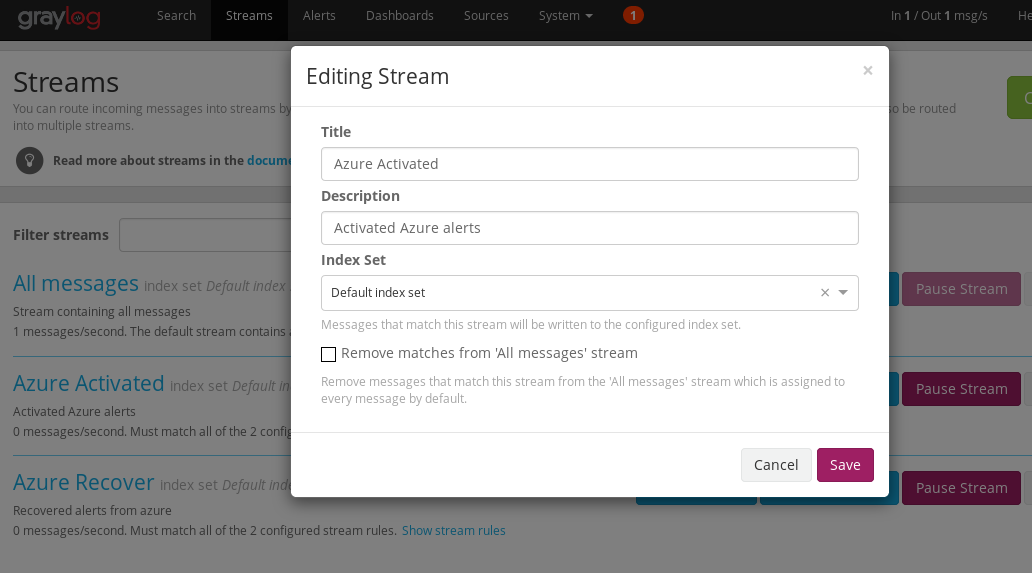
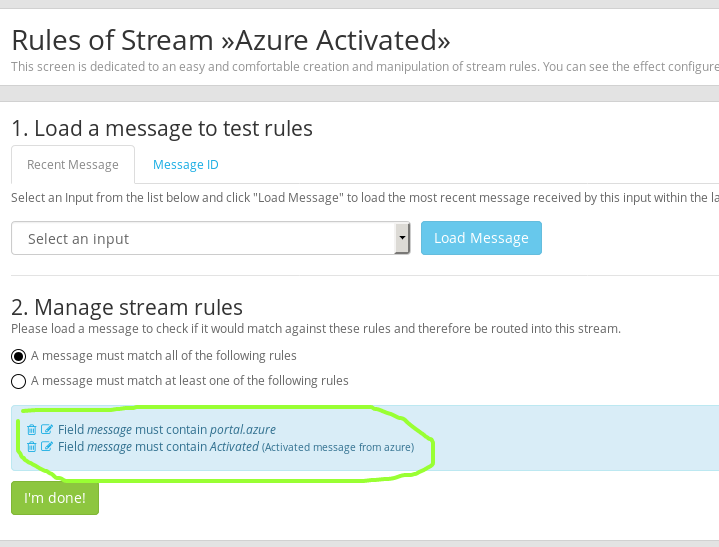
And add rule for it:
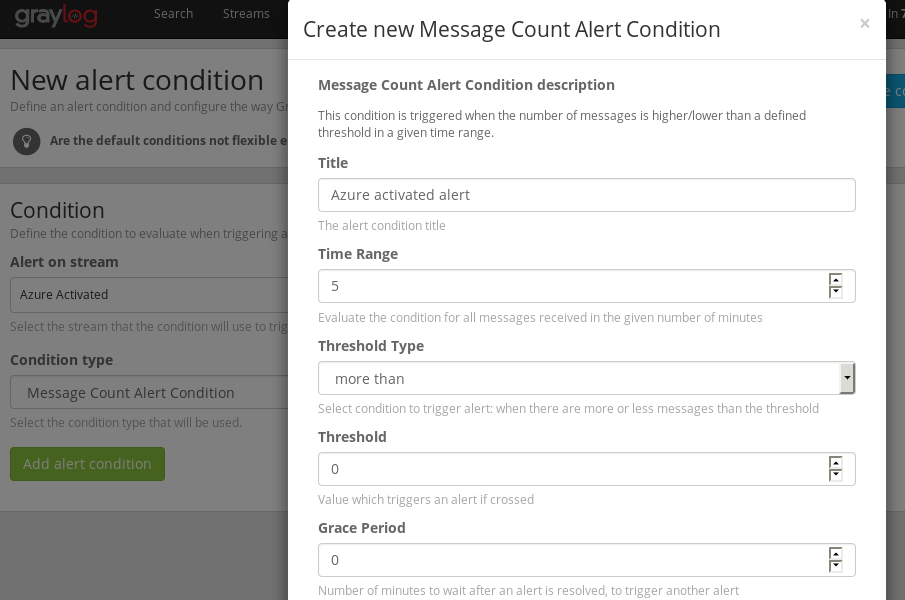
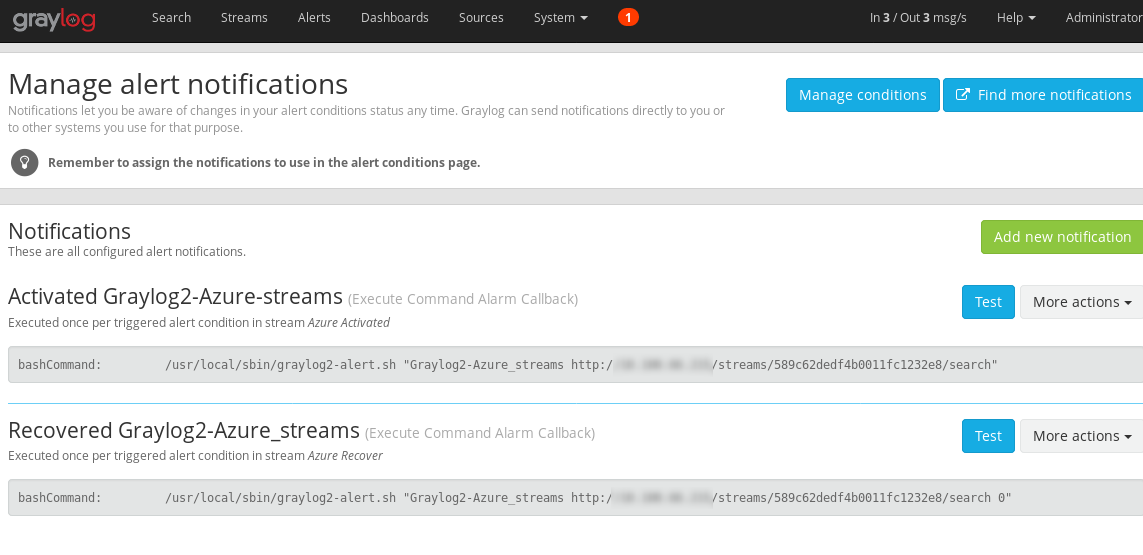
Now we will create **Graylog_alert For our stream
create new alert condition like:
Then add Notifications as Exec callback plugins
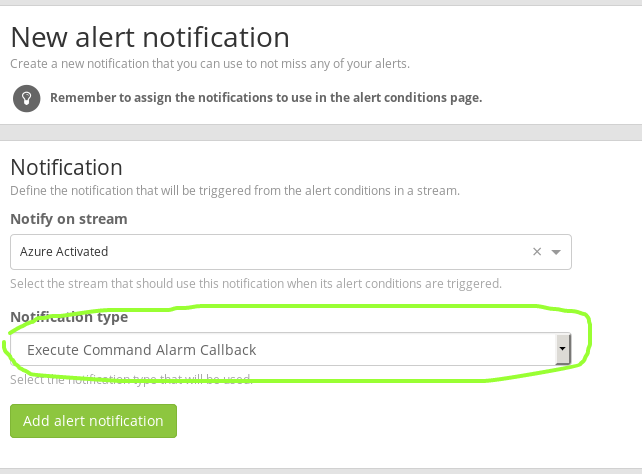
Add to your notification command:
- Title:
Activated Graylog2-Azure-streams - Command:
/usr/local/sbin/graylog2-alert.sh "Graylog2-Azure_streams http://YOURGRAYLOGIP/streams/589c62dedf4b0011fc1232e8/search"
Where Graylog2-Azure_streams is the service name on nagios. And second parameter is a message to put in the check
589c62dedf4b0011fc1232e8 is the id for your stream.
You will then have and will be able to test directly from graylog:
That’s it.
Now you can add many streams and more nagios services for each of your streams with your own settings.
These examples are done with Azure alerts, but they apply to any other kind of alert.
Graylog2 - 2 - logstash input http
Introduction
- Configure GELF input in graylog.
- Prepare logstash to input data from any http post.
- Send data to GELF input in graylog using plugins_output_gelf.

Requirements Ansible
As explained in Generic-help installing roles. And at Graylog_ansible_installing_roles
We will use requirements.yml to add this:
- src: mrlesmithjr.logstash
  name: ansible-logstash
  version: master
Then install with ansible-galaxy install -r requirements.yml
It will install the role with name ansible-logstash, we will use that name in our playbook.
Requirements Graylog2
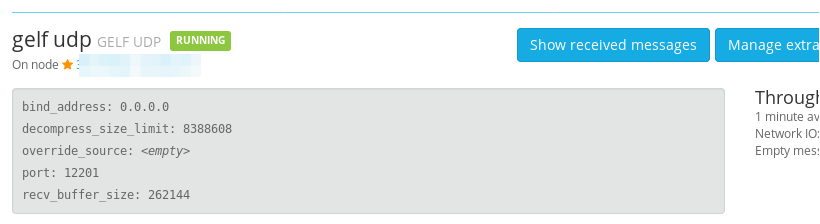
Here we need to add an input to receive the messages from logstash.
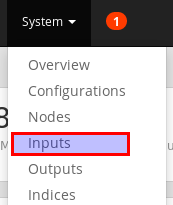
- Select GELF UDP INPUT.
- We will use port 12201
- save
- Start the input
After done, you could see something like:
Port below 1024 will not work
Graylog2 is running as normal user, linux will not allow port below 1024
Ansible Inventory
We will use same inventory as created at: at Graylog_ansible_inventory
Preparing the playbook to run the roles
Here we will add to roles.graylog2.yml as examplained at: Graylog_ansible_playbook
- name: Apply logstash for graylog2 servers
  hosts: graylog2_servers
  become: yes

  roles:

    - role: ansible-logstash
      tags:
        - role::logstash
        - graylog2_servers
Preparing the variables
We will create new file group_vars/graylog2_servers/logstash_vars
The folder was created during the preparatives at: Graylog_ansible_variables
Variables:
# logstash role:

pri_domain_name: 'example.com'
config_logstash: True
logstash_install_java: false

# These are the files that will be used and will be created in `/etc/logstash/conf.d/`
logstash_base_configs:
  - '000_inputs'
  - '001_filters'
  - '999_outputs'

# Plugins required by us
logstash_plugins:
  - 'logstash-output-nagios_nsca'
  - 'logstash-output-gelf'

# see https://github.com/mrlesmithjr/ansible-logstash
logstash_base_file_inputs: []


# We don't need it really, but will add anyway
logstash_base_inputs:  #define inputs below to configure
  - prot: 'tcp'
    port: '10514'  #gets around port < 1024 (Note...Configure clients to send to 10514 instead of default 514)
    type: 'syslog'

# Here we are creating one input, in this case we will add a tag to make it easier to filter
# example is with azure tag, but can be any other.
logstash_custom_inputs:
  - input: 'http'
    lines:
      - 'port => "51202"'
      - 'type => "http"'
      - 'tags => "azure"'

# Here we will use the tag to create a filter and apply json module to
# transform the message into json format
logstash_custom_filters:
  - lines:
      - 'if "azure" in [tags] {'
      - '  json {'
      - '    source => "message"'
      - '  }'
      - '}'

# As we will not use any default output, we will leave it as empty list []
logstash_base_outputs: []

# Here we will tell ansible role to configure the output to our GELF UDP input.
logstash_custom_outputs:

  - output: 'gelf'
    lines:
      - 'host => "localhost"'
      - 'port => "12201"'
All these vars will tell what we exactly want from ansible role for logstash.
Run the playbook
use same steps as described in: Graylog_ansible_run
Or run only logstash role calling with tag:
ansible-playbook -i inventory roles.graylog2.yml --limit graylog2_servers -u user -k -K --become --tags role::logstash
Test your logstash http input
Test command:
curl -XPOST http://yourhost:51202/ -p0 -d '{"status": "Activated", "host":"portal.azure.com", "context": {"portalLink": "https://portal.azure.com/#resource/subscriptions/s1/resourceGroups/useast/providers/microsoft.foo/sites/mysite1"},"facility":"test", "_foo":"bar"}'
Upgrading logstash
Just use normal package upgrade from your distribution.
Receive Azure alarms
Just setup your azure alarms,
to your public IP and HTTP Port: 51201 as done at Preparing the variables
Ansible win Update and Security patching
Updating windows with ansible
Patching windows is a very time consuming task, but working with ansible you could reduce this time significantly.
Here I will share some playbooks that will help on these tasks.
First of all, you must ensure to keep all your windows servers updated:
---
# file: windows-updates-all.yml

- hosts: all
  any_errors_fatal: false
  serial:
   - 1
   - 5%
   - 25%
  max_fail_percentage: 10%
  vars:
    win_updates_categories:
      - CriticalUpdates
      - SecurityUpdates
  tasks:
  # Check if there are missing updates
  - name: Check for missing updates.
    win_updates:
      state: searched
      category_names: "{{ win_updates_categories }}"
    register: update_count
    ignore_errors: yes

  - name: Reboot if needed
    win_shell: Restart-Computer -Force
    when: update_count.reboot_required
    ignore_errors: yes

  - name: Install missing updates.
    win_updates:
      category_names: "{{ win_updates_categories }}"
    register: update_result

  - name: Reboot if needed
    win_shell: Restart-Computer -Force
    when: update_result.reboot_required
    ignore_errors: yes
Audit windows patches with ansible
Then you need to test if the important patch is installed.
We will use in this case the information about patches for ramsomeware, normally in windows this information is obtained in this way:
# Windows7 win2008 ServicePack2:
get-hotfix -id "kb4012598"

# win2008R2 hotfix RAMSOMWARE MARCH 2017:
get-hotfix -id "KB4012212"

# win2012R2 hotfix RAMSOMEWARE MARCH 2017:
get-hotfix -id "KB4012213"

# Windows2012 hotfix RAMSOMEWARE MARCH 2017:
get-hotfix -id  "KB4012214"

# win2003 hotifx RAMWOMEWARE MARCH 2017:
# KB4012598
# Windows 2003 doesn't provide get-hotfix and can't be managed with winrm.
Then we will use this playbook to audit the servers:
- name: verify windows patches
  hosts: all
  any_errors_fatal: false
  serial:
   - 100%
  max_fail_percentage: 10%
  tasks:
  # Verify windows updates
  - name: verify windows patch windows 2008 R2
    win_shell: get-hotfix {{ item.id }}
    when: "'Windows Server 2008 R2' in ansible_os_name"
    with_items:
      - id: KB4012212
        description: hotfix RAMSOMWARE MARCH 2017
    changed_when: false

  # Verify windows updates
  - name: verify windows patch windows 2008 Standard
    win_shell: get-hotfix {{ item.id }}
    when: "'Windows Server 2008 Standard' in ansible_os_name"
    with_items:
      - id: kb4012598
        description: hotfix RAMSOMWARE MARCH 2017
    changed_when: false

  # Verify windows updates
  - name: verify windows patch windows 2012 R2
    win_shell: get-hotfix {{ item.id }}
    when: "'Windows Server 2012 R2' in ansible_os_name"
    with_items:
      - id: KB4012213
        description: hotfix RAMSOMWARE MARCH 2017
    changed_when: false

  # Verify windows updates
  - name: verify windows patch windows 2012 Standard
    win_shell: get-hotfix {{ item.id }}
    when: "'Windows Server 2012 Standard' in ansible_os_name"
    with_items:
      - id: KB4012214
        description: hotfix RAMSOMWARE MARCH 2017
    changed_when: false
Workaround some patches
In some cases, patching windows is not enough or sometimes windows has some undesired errors that doesn’t allow to install the KB.
For these cases we can workaround over windows, we can do this for example to a group or list of hosts.
I will add an example to workaround ramsomeware:
# https://technet.microsoft.com/en-us/library/security/ms17-010.aspx

- name: Apply ramsomeware patch disable smb v1
  hosts: group1,server,server2
  tasks:
  - name: apply ramsomeware patch disable smb v1
    win_regedit: key={{ item.key }} value={{item.value}} data={{ item.data}} datatype={{ item.datatype }} state=present
    with_items:
      - key: 'HKLM:\SYSTEM\CurrentControlSet\Services\LanmanServer\Parameters'
        value: 'SMB1'
        datatype: 'dword'
        data: '0'
    register: apply_patch_ramsomeware

  - name: Reboot if needed
    win_shell: Restart-Computer -Force
    when: apply_patch_ramsomeware.changed
    ignore_errors: yes
Graylog2 - 1 - with ansible
Introduction
Graylog2 is an excelent log management and server, with many features and nice GUI interface to use and configure streams, inputs, alerts, searchs, dashboards, etc.
This document will explain how setup graylog2 using ansible.
This document will be base for future documents that explain how to add more customizations with other roles:
- Upgrading practice example.
- Input from logstash. Done at: Graylog_ansible_logstash_input
- Receive azure alarms. Done at: Graylog_ansible_logstash_input
- Configure commands to send alarms to nagios with nsca. Done: Graylog_ansible_logstash_nagios_nsca
- Configure nagios to receive them. Done: Graylog_ansible_logstash_nagios_nsca
- Explain more about graylog with more links to graylog documentation. TODO
Requirements
You need to know some basics from ansible, and ofcourse install ansible
Don’t be scared about it, ansible is the most simple IT automation tool and you will get benefits learing this to manage any other thing on your servers. Check also how ansible works, and get-started
Installing roles
Before starting to define the usage of our roles, we need them installed on our ansible-control-machine. As we will use this machine to actively connect and push configurations to our graylog2 server.
We will use requirements.yml file to make the installation of roles faster.
Add/create your requirements.yml file:
# graylog2

- src: graylog2.graylog-ansible-role
  version: 2.4.0

# graylog2 dependency

- src: lesmyrmidons.mongodb
  version: v1.2.8

- src: geerlingguy.java
  version: master

# 0.2 is required version to use elasticsearch 2.x
- src: elastic.elasticsearch
  version: "5.5.1"

- src: jdauphant.nginx
  version: master
As written in the requirements.yml file, elasticsearch must be version 2. So we need to use the branch for 0.2 of the role.
Install from requirements.yml
sudo ansible-galaxy install -r requirements.yml
Note
The graylog2 server can be also your ansible-control-machine if you don’t have other, using localhost as node in your inventory as shown below.
Elasticsearch and java version matters
You must ensure to be using elasticsearch 2, and java from openjdk-8, we will cover these steps below, but this note will help you to know and remmember that.
Preparing the inventory
We will setup a group called graylog2_servers with the hosts added to it.
You need to create/edit your inventory to tell ansible which server is on graylog2_servers group.
We will create a folder called inventory and a file called production on it.
file: inventory/production
content:
[location1]
server1     ansible_host=192.168.1.50

[graylog2_servers]
server1
In this example I have added server1 to groups location1 and graylog2_servers.
Note also I have added ansible_host variable with the IP address of server1, so ansible will use automatically this
to connect to the host.
other generic example: example1/inventory/test
Preparing the playbook to run the roles
We will define a playbook to include our roles.
We will prepare a file called roles.graylog2.yml with this definition:
---
# This --- defines that this yaml file will have 2 spaces for indentation.


# In case you use Ubuntu trusty we will add ppa for java-jdk8
# as noticed on warning above we need to take care of it.

- name: Add java-jdk-8 ppa for Ubuntu trusty
  hosts: graylog2_servers
  become: yes

  # You can specify a proxy_env var with your proxy settings here
  # check example: https://github.com/CoffeeITWorks/ansible-generic-help/blob/master/example1/group_vars/all/vars#L14
  #environment: "{{ proxy_env }}"

  tasks:
    - name: installing repo for Java 8 in Ubuntu 14.04
      apt_repository: repo='ppa:openjdk-r/ppa'
      when: ansible_distribution_release == 'trusty'

# Now we will apply all roles to our graylog2_servers:

- name: Apply roles for graylog2 servers
  hosts: graylog2_servers
  become: yes

  # You can specify a proxy_env var with your proxy settings here
  # check example: https://github.com/CoffeeITWorks/ansible-generic-help/blob/master/example1/group_vars/all/vars#L14
  #environment: "{{ proxy_env }}"

  roles:

    - role: lesmyrmidons.mongodb
      tags:
        - role::mongodb
        - graylog2_servers

    # This step is important as described in waring above
    - role: geerlingguy.java
      when: ansible_distribution_release == 'trusty'
      java_packages:
        - openjdk-8-jdk
      tags:
        - role::elasticsearch
        - graylog2_servers

    # This step is important as described in waring above
    - role: geerlingguy.java
      when: ansible_os_family == "RedHat" and ansible_lsb.major_release|int >= 7
      java_packages:
        - java-1.8-openjdk
      tags:
        - role::elasticsearch
        - graylog2_servers

    # ensure you have installed 0.2 branch for elasticsearch 2.x
    - role: elastic.elasticsearch
      tags:
        - role::elasticsearch
        - graylog2_servers

    - role: jdauphant.nginx
      tags:
        - role::nginx
        - graylog2_servers

    # Here we will install graylog
    - role: graylog2.graylog
      tags:
        - role::graylog
        - graylog2_servers
Preparing the variables
We have an inventory and a playbook to call the roles, but we must customize the variables before running the playbook.
Here we will organize the variables files into the group_vars directory:
mkdir -p group_vars/graylog2_servers
Then add a file to have organized the variables for elasticsearch.
group_vars/graylog2_servers/elasticsearch2_vars file:
In this file we will define es cluster, bind address, version, memory, etc.
---
# https://github.com/Graylog2/graylog-ansible-role

es_instance_name: 'graylog'
es_scripts: False
es_templates: False
es_version_lock: False
es_heap_size: 1g

# Graylog2.3 supports elasticsearch 5, so must install elasticsearch 5.x
es_major_version: "5.x"
es_version: "5.6.7"

graylog_version: '2.4'
# pin version is broken in: 2.3.0 of ansible_graylog2_role
# hope will be fixed on future, you will need to delete /etc/apt/preferences.d/elasticsearch
# see https://github.com/Graylog2/graylog-ansible-role/commit/4e24252bd71e4cc2bb53df0a069c617138dc09cd#commitcomment-25811249
graylog_es_debian_pin_version: '5.*'

es_config: {
  node.name: "graylog",
  cluster.name: "graylog",
  http.port: 9200,
  transport.tcp.port: 9300,
  network.host: 0.0.0.0,
  node.data: true,
  node.master: true,
}


# Ensure to add this option if not added elastic.elasticsearch will install openjdk-7 that will break graylog2
es_java_install:               False
Then add a file to have organized the variables for graylog role.
group_vars/graylog2_servers/graylog2_vars file:
---

# Disable autoinstall of elasticsearch, java, mongodb, etc, as we will use our own playbook to call the roles:
# And ensure correct java version is installed in this way
graylog_install_elasticsearch: False
graylog_install_mongodb:       False
graylog_install_nginx:         False
graylog_install_java:          False

# Basic server settings (seems that this should go per host)
graylog_is_master:          'True'

# generate with: pwgen -s 96 1
graylog_password_secret:    'putyourhashhere'

# generate with: echo -n yourpassword | shasum -a 256
graylog_root_password_sha2: 'putyourhashhere'

# Elasticsearch message retention
# Specify your retention here
graylog_elasticsearch_max_docs_per_index:    20000000
graylog_elasticsearch_max_number_of_indices: 20
graylog_elasticsearch_shards:                4
graylog_elasticsearch_replicas:              0

graylog_rest_listen_uri:  'http://0.0.0.0:9000/api/'
graylog_web_listen_uri:   'http://0.0.0.0:9000/'

nginx_sites:

  graylog:
    - listen 80
    - server_name graylog
    - location / {
      proxy_pass http://localhost:9000/;
      proxy_set_header Host $host;
      proxy_set_header X-Real-IP $remote_addr;
      proxy_set_header X-Forwarded-For $proxy_add_x_forwarded_for;
      proxy_pass_request_headers on;
      proxy_connect_timeout 150;
      proxy_send_timeout 100;
      proxy_read_timeout 100;
      proxy_buffers 4 32k;
      client_max_body_size 8m;
      client_body_buffer_size 128k; }

# Setup per host on host_vars:
graylog_web_endpoint_uri: 'http://{{ ansible_host }}:9000/api/'

# Optionally for Ubuntu 14.04 you can use:
mongodb_repository: "deb [ arch=amd64 ] http://repo.mongodb.org/apt/ubuntu trusty/mongodb-org/3.4 multiverse"
Not all the variables are required, but I prefer to be explicit on these settings. The documentation of these vars are
on the readme of each role, also the defaults used are on the defaults/main.yml file of each role (we are overriding the
defaults when assigning the vars on group_vars).
See playbook_variables for more information
Review what’s done until now
We have created:
requirements.ymlfileinventory/productionfileroles.graylog2.ymlfilegroup_vars/graylog2_serversdir withelasticsearch_varsandgraylog2_varsfiles
So, our tree looks:
├── requirements.yml
├── group_vars
│   ├── graylog2_servers
│   │   ├── graylog2_vars
│   │   ├── elasticsearch_vars
├── inventory
│   ├── production
├── roles.graylog2.yml
With this structure we have all required to call our roles with correct parameters. As seen on the roles.graylog2.yml, we have associated the roles to run to graylog2_servers group.
Run the playbook
We will execute here:
ansible-playbook -i inventory roles.graylog2.yml --limit graylog2_servers -u user -k -K --become
To understand some of the parameters used here:
-l SUBSET, --limit=SUBSET
                    further limit selected hosts to an additional pattern
-i PATH, --inventory=PATH
                    The PATH to the inventory hosts file, which defaults to /etc/ansible/hosts.
-k, --ask-pass
                    Prompt for the SSH password instead of assuming key-based authentication with ssh-agent.
-K, --ask-sudo-pass
                    Prompt for the password to use for playbook plays that request sudo access, if any.
-b, --become
                    run operations with become (does not imply password prompting)
-u USERNAME, --remote-user=USERNAME
                    Use this remote user name on playbook steps that do not indicate a user name to run as.
As seen on the command, we use -i inventory directory instead of the file, you can change it to point to the file directly.
You can also check ansible-vault to save password.
You can also check variables to use in group_vars/all or some other group using inventory_parameters
Ansible connections are done by default with ssh, you can change them using inventory_parameters and also disable host-key-checking.
Create ansible.cfg file on same dir where you run ansible-playbook command and it will read that parameters.
Upgrading Graylog
As ansible role is updated every time graylog is update too (check graylog_version). You only need to update the role installed, ex:
sudo rm -rf /etc/ansible/roles/graylog2.graylog
sudo ansible-galaxy install -r requirements.yml
Then run the playbook again.
This will update your graylog repository, for example in my output I have:
TASK [graylog2.graylog : Graylog repository package should be downloaded] ******
changed: [server1] => {"changed": true, "checksum_dest": null, "checksum_src": "ddc77cda9473f6556844c19d68c2c8de05d9dedc", "dest
": "/tmp/graylog_repository.deb", "gid": 0, "group": "root", "md5sum": "df0ded30076548179772cd23bfff869f", "mode": "0644", "msg":
"OK (2056 bytes)", "owner": "root", "size": 2056, "src": "/tmp/tmpjrGQFl", "state": "file", "uid": 0, "url": "https://packages.gra
ylog2.org/repo/packages/graylog-2.2-repository_latest.deb"}
Then just upgrade on your server:
sudo apt-get upgrade
Or with yum:
sudo yum update
If for some reason the role is not updated, you can add to your group_vars/graylog2_servers/graylog2_vars, ex:
graylog_version: 2.2
It should make same effect but without the fixes and improvements added to the role. It’s recommended to update the role, and also check the release notes of both: role and graylog2.
Ensure you are not upgrading elasticsearch to 5.x, to not break graylog. (should not do that if you did all steps in this page)